Table of Contents
Built-in Raytracers and their Options
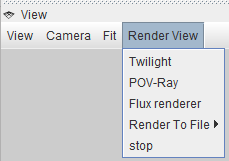
GroIMP contains a built-in raytracer (as opposed to external raytracers such as POV-Ray), which can utilize a set of different ray processors. This is the so-called “Twilight” renderer. Included are a the “standard ray tracer”, a path tracer, photon mapping, a bidirectional path tracer, and processors for radiosity as well as metropolis light transport. The raytracers can be used for both light modelling within your RGG model as well as for rendering your scene. The following introduction covers the raytracing settings when used for rendering. To use the Twilight renderer, select it as your Render View:
When starting any of these renderers, your Scene will be rendered as an image using the current camera viewpoint. In case it takes too long, you can interrupt the process with Stop. In some cases, this might not work and GroIMP dies, so be sure to save your project before experimenting with the renderers. When you moove the camera after the renderer has finished, the 3D View switches back to the default “interactive” OpenGL renderer.
More information:
Tutorials:
Default Light Model
The built-in raytacer also provides a light model to use in a rgg project.
Tutorial:
GPUFlux
GroIMP provides a GPU-based ray tracer based on a Monte-Carlo method. It utilizes available computing resources through OpenCL. During simulation, each object keeps track of the amount of light it absorbs. Per object, it either computes a fully discretized absorption spectrum or several integrated weighted spectra, which are subsequently used in a photosynthesis model.
GPUFlux implements on GPU three well known, physically based rendering algorithms: Path Tracing (PT), BiDirectional Path Tracing (BDPT) and Energy Redistribution Path Tracing (ERPT).
The complete documentation on GPUFlux:
Tutorials:
Flux Renderer
The GPUFlux plugin also provide a renderer on the GPU. This renderer is accessible from the 3D view, under Render View>Flux Renderer.
More documentation:
Custom Renderer
External renders can be used to create a 3D view of higher quality. The POV-Ray Plugin provides a scene export to the POV-Ray format which makes it possible to use the free ray-tracer POV-Ray as an external renderer, see the POV-Ray manual. The resulting image is directly shown in GroIMP's 3D view.
Tutorials:

